Monday, June 15, 2015

Graphite Portraits

For our final drawing project, we decided to get down to business! People are easily one of the hardest subjects to draw because if you are just a little off, it won't look right. That being said, my students BLEW ME OUT OF THE WATER with what they accomplished. We began the lesson by having everyone draw a portrait with no instruction and then I showed them the most commonly made mistakes when drawing the face. We then went through the rights and wrongs of drawing lips, eyes, noses, and hair.

After demonstrating how to sketch and measure the dimensions of the face, the students were off! Each with a picture of a celebrity, they patiently drew for the remaining weeks of school.
Talitha Call, grade 7, drew Lindsey Stirling. Teeth are hard and she nailed it!


Rebecca Ross, Grade 6, drew Taylor Swift.

Larisa Kozhevnikova, Grade 10, drew a Russian celeb whose name now escapes me...

Vincent Baird, Grade 7, drew Tim Tebow.

Amariah Adams, Grade 9, drew Jennifer Lawrence. The Charcoal was an excellent touch to made this portrait really pop!
Julia Fox, Grade 8, drew Emma Stone. They actually look very much alike and she did wonderful!


As a teacher, I am tremendously proud of how well everyone did and of all that we accomplished this year! I'm going to miss my amazing artists!

Sunday, June 14, 2015

Color Theory T-Shirt Designs

To top off our unit on color theory we challenged our students creativity and knowledge of color schemes. Each student was tasked with the goal of designing 4 t-shirt designs that represent 4 different color schemes. 

As per usual, craftsmanship was of utmost focus for this project. It seems elementary to teach MS and HS students to color, but it pays off.

Here, Chloe uses monochromatic, complimentary, primary, and warm color schemes.

Marie implemented analogous, cool, secondary, and primary color schemes.

And Angelina used warm, monochromatic, cool, and complimentary color schemes.

As always, it was so fun to see everyone's personalities show through their designs and how they implemented the various color schemes.


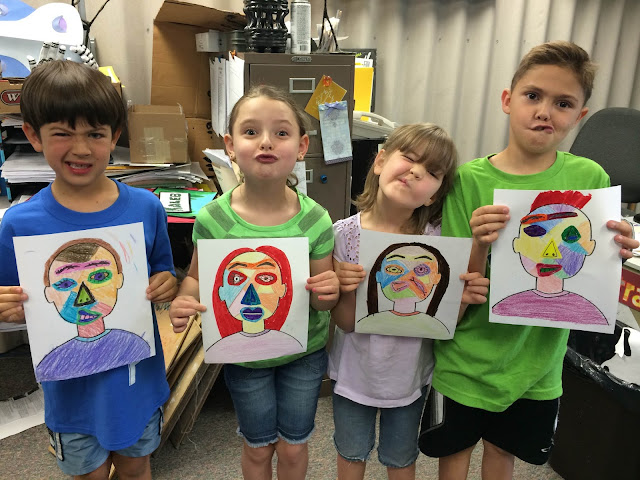
Picasso Portraits

You can't end a school year of art without learning about Pablo Picasso! I am constantly telling the kids that so many artists are famous because they were the first to do something new, innovative or exciting-Picasso is definitely one of those artists.  At the end of a period of classical art, Picasso came out and began doing abstract art unlike any other- founding Cubism. As a class we read a brief Biography of Picasso as seen here.

We then read a fun book called "Picasso and the Girl with the Ponytail" which is actually a true story that features a lot of Picasso's artwork!
Then, using a face template we divided it into angular shapes, learned how to color using nice, clean craftsmanship, and Picasso-ed away!


Chayse is a looker! 

Loving the hair, Emily!

It looks just like them!

Ruth is the sweetest, even in cubist format!

Way to go, Lillian!
This was a 2-week project and I loved that the children remembered so many terms, details, and facts about Picasso and his legacy from week to week! 
This is a lesson meant to stick!


Sunday, June 7, 2015

Mendhi Hand Casts

Henna has been used for hundreds of years and is a natural plant dye. When applied to the skin, the henna produces a temporary stain. Mehndi is the Hindi word used to describe the art of henna. Traditionally henna is applied on the hands and feet and is used for weddings and religious occasions such as Eid, Diwali and for the blessing on the birth of a child or to bring good fortune into one’s home. Today henna is also used to temporarily decorate your body, as a form of self expression and body art. There are many symbols used in Henna meant to bless the one adorned with the artwork.

Naturally, I wasn't going to assign your children to tattoo each other up, but this seemed like a new opportunity to create a cast sculpture while learning a little bit more about other cultures!

Before doing anything we learned how to draw various henna symbols and designs. The students were tasked to sketch and ink various symbols that best represented them such as the following:
Peacocks ~ beauty
Swans ~ success
Birds ~ messengers (between heaven and earth)
Dragonflies ~ rebirth
Fishes ~ a womans eyes
Flowers ~ joy and happiness
Vines and leaves ~ longevity, devotion, perseverance, entwined lives and vitality
Tortoise ~ Protection and fertility
Lotus Blossom ~ the light within / the awakening of the human soul. Grace, beauty, creativity, sensuality, femininity, and purity.
Sun, Moon,and Stars ~ deep and lasting love between lovers/partners
Paiselys ~ represent fertility and good luck
  Next we used plaster strips to create a plaster cast of our hands. Casts are the initial step in making molds, and it a pretty fun process!


After making two half casts, students attached them together to create a complete mold. Then, after sketching their designs onto their hand cast, students painted their "henna" on. I mean, come on-how cool are these?!


Saturday, May 9, 2015

Mother's Day Cards


I remember the first or second week I started at SVLA, I asked our students what types of art they wanted to try/learn. I distinctly remember one student in 3rd grade REALLY wanting to learn origami... so fast forward 8 months, here we are!

We learned that "ori" actually means "folding" and "kami" (or "gami") means paper, so "origami" literally means "folding paper" and that it is prominent primarily in Japanese culture.

For Mother's Day we brainstormed various adjectives to describe our mothers and wrote them on our cards. Then, we folded beautiful origami tulips to attach to the back.


I was basically dying of cuteness.


Grades 4-5 created some pop-up cards! Again, we brainstormed adjectives that describe our mothers, and wrote them on the front of our cards. They were in and out so fast that I didn't get pictures of our older kids cards :( So, all we have here are the examples. Even so, they did lovely work (as I'm sure you already know!)


Hope everyone had a perfect Mother's Day! Thanks moms for all that you do!!!


After School Ceramics Class!

I'm so excited about the turn out for our after-school ceramics class! With about 15 students, all sorts of styles, preferences, and combinations came about in our projects!

During week one, we learned where ceramics and clay are used today! For example, we talked about how all of our dishes come from a mold that was created around a original wheel-thrown plate or bowl. Or, how important molding and sculpting clay is for the first step in creating special effects make-up, like the prosthetics on Jim Carrey in "How the Grinch Stole Christmas."

In week one, we learned that you must score (scratch up) the clay before attaching one piece to the next. We made cupcake pinch pots which combines the process of pinch pots and coils!


Week two we painted our cupcakes and used different brushes and techniques to glaze cleanly and beautifully.
We also briefly talked about color schemes and planning what sections to color what in order to create an overall consistent and appealing final product. For example, we talked about how complimentary colors (colors that are opposite on the color wheel) create contrast! We see complimentary colors with Christmas (red and green) and in a lot of sports teams like the Broncos (orange and blue) and the Lakers (purple and yellow). We also saw how using one color on the bottom, and then the same color somewhere on top can help unify the entire piece.

How wonderful do these look?!


Week three we decided to make a little something sweet for Mother's day. By creating various round slabs, we were able to make beautiful rose sculptures. You cannot go wrong with this project, they are all so beautiful!


A class of planning and glazing later, We couldn't be happier with how these turned out (and hope our mothers loved them too!)